![]()
You will use the entries in this menu to open, close and save files, setup the printer, get information about the program and exit the program.
File | New
Shortcut : Ctrl+N ![]()
This menu is used to create a new scene. The system will ask to save any changes to the current scene if a scene is already open.
File | Open...
Shortcut : Ctrl+O ![]()
This menu is used to open an existing scene. You will be presented with the standard file dialog in the scenes directory.
After you have selected a scene, the current scene will be closed and the new scene will be opened.
If the current scene was changed since the last save you will get the opportunity the save these changes or cancel the open command.
File | Open and Update...
Like the above Open command except that all fixture definitions are fetch into the Spots folder and replace with the new ones.
Example, new fixture definition include new 2D symbols for printing. so to update scene made with previous fixture definition, use the Open and Update
File | Close
Use this menu item to close the current scene. If the current scene has any unsaved changes you will get the opportunity to save these before the scene is closed.
File | Save
Shortcut : Ctrl+S ![]()
Save is used to save the current scene. If the current scene was never saved before, you must enter a name for the new scene.
File | Save As...
This menu item is used to give the scene a new name. If you use this option you must select a new name for the scene. The scene is then saved using this name. Any subsequent saves of the scene will be done using this name.
File | Export Block...
Use Export Block to save a portion of a scene as a Scene Block or Fixture Block
File | Fast-Switch
Use Fast-Switch to open the current scene into another module. See Fast-Switch for more details
File | Print Setup...
This option allows you to setup the current printer.
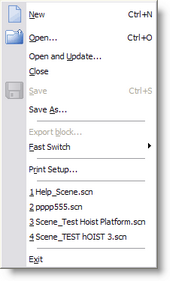
File | Recent files
Here you will find the 4 last saved/opened files. By selecting one of these files you can open the selected scene.
File | Exit
Shortcut : Alt+F4
This option will shut down the program. If there is a scene open and if this scene has any unsaved changes you will be asked to save these changes or cancel the operation.
![]()
Cue | Select Cue...
This option shows the Cue List.
Cue | Save Cue As...
See Cue List for more details
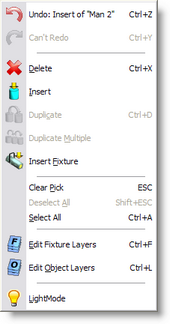
You will use the entries in this menu to delete, copy and insert objects and fixtures, clear pick or selection, edit layers and switch between 'Light Mode' and 'Normal Mode'.
Edit | Undo
Shortcut : Ctrl+Z ![]()
This option will undo the last action (if there is one). The text after 'Undo' indicates the nature of the last action.
Edit | Redo
Shortcut : Ctrl+Y ![]()
This option will redo the last 'undone' action (if there is one). The text after 'Redo' indicates the nature of the last 'undone' action.
Edit | Delete
Shortcut : Ctrl+X ![]()
This option will delete the picked object.
Edit | Duplicate
Shortcut : Ctrl+D ![]()
This option will copy the picked object. When you click with your left mouse button inside a window, the copy will be inserted into the scene.
If you keep the mouse button down, you can directly move the inserted copy around until you release the mouse button.
Edit | Duplicate Multiple
![]()
This option will make multiple copies of the picked object. When you click with your left mouse button inside a window, a dialog will appear.
See Duplicate Object or Fixture
Edit | Insert
![]()
This option allows you to insert an object from the object list into the scene. See Object List for more information about objects. When you click in a window after selecting this option a list of available objects will appear. The desired object will be inserted after clicking on it in the list.
Edit | Insert Fixture
![]()
This option allows you to insert a fixture from the fixture list into the scene. See Fixture List for more information about fixtures. When you click in a window after selecting this option a list of available fixture manufacturers will appear. When you move your mouse over the desired manufacturer, all available fixtures from that manufacturer will appear. The desired fixture will be inserted after clicking on it in the list.
Edit | Clear Pick
Shortcut : ESC
This option clears the current pick. If you had something picked, it will be unpicked.
Edit | Deselect All
Shortcut : Shift+ESC
This option clears the selection. If you have one or more objects selected, they will be de-selected.
Edit | Edit Fixture Layers
Shortcut : Ctrl+F ![]()
When you select this option, a dialog will appear. See Layers for more details
Edit | Edit Object Layers
Shortcut : Ctrl+L ![]()
When you select this option, a dialog will appear. See Layers for more details
In this dialog, you can edit the object layers. You can edit the name of a layer by clicking in the left box (layer line will become active), and then clicking in it again. You can then edit the existing name or enter a new name. You can make one of the layers 'Active'. This means that any new objects will be placed on that layer. In the 'Visible' column, you can select which layers are visible or hidden. The 'Active' layer must be visible, because otherwise, you would not see objects you add to the scene.
Edit | LightMode
![]()
This option activates and deactivates the LightMode. When you are working in LightMode, you can only pick fixtures. All other objects are ignored when you try to pick something.
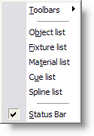
You can use the entries in this menu to view or hide the toolbars holding the buttons, the different lists and the status bar at the bottom of the main window. If an item is visible a check mark will be displayed in front of the menu item.
View | Toolbars
This menu is used to show or hide the toolbars. For an overview of all the buttons in the toolbars you can look at the Icon topic.
View | Object list...
This option shows the Object List window. In this window you can delete, rename and import objects. In a new scene this list will be initially empty.
View | Fixture list...
This option shows the Fixture List window. In this window you can delete, rename and import fixtures.
View | Material list...
This option shows the Material List window. In this window you can edit, copy, import, delete and create new materials. In a new scene this list will be initially empty.
View | Cue list...
This option shows the Cue List window. In this window you can edit, delete and create new cues. In a new scene this list will be initially empty.
View | Status Bar
This menu is used to show or hide the status bar.
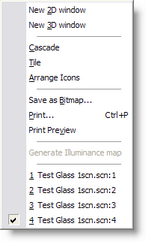
You will use the entries in this menu to open or arrange windows and to save or print windows.
Window | New 2D window
This option opens a new 2D window.
Window | New 3D window
This option opens a new 3D window.
Window | Cascade
This option will arrange all open windows to be all the same size, stacked one on top of another.
Window | Tile
This option will arrange all open windows to be tiled side by side, so all windows will be totally visible.
Window | Arrange Icons
This option will arrange all icons at the bottom of the main window.
Window | Save as Bitmap...
This option allows you to save a window as a Windows bitmap (BMP) or a jpeg image (JPG).
Window | Print...
Shortcut : Ctrl+P ![]()
This option allows you to print a window. The print will always be in wireframe mode.
See Printing in ShowDesigner Module for more details
Window | Print Preview
This option allows you to preview how a window will be printed.
See Printing in ShowDesigner Module for more details
Window | (Opened windows)
Here you will see how many windows you have open and which is active. You can activate a specific window by choosing its menu item.
This menu allows you to select the display mode of a window. It gives you a range of representations of a scene.
See Display Mode for more details
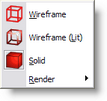
Display Mode | Render
![]()
![]()
![]()
![]()
Display Mode, Render menu
This menu will only be available in a 3D window. It allows you to realistic render your scene, taking into account lighting, reflection, shadows, smoke etc.
See Rendering for more details
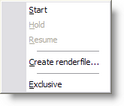
Display Mode | Render | Start
The start option will start the rendering of the scene.
Display Mode | Render | Hold
The Hold option will temporarily stop rendering the window. This might be useful if you are rendering a complex scene. By setting the rendering on hold, you get more time to do other things (in this application or another). This option is only available if you are currently rendering in the window.
Display Mode | Render | Resume
The Resume option will resume rendering a window, which was previously stopped by using the Hold option. This option is only available if the window is currently in a 'hold rendering' mode.
Display Mode | Render | Trace Rect
The Trace Rect option is a special case of the Start option which allows you to first select/manipulate a rectangle within the window, and then right-click in the window to start rendering the rectangle
Display Mode | Render | Create Render file
Use this to create a render for the Fast NetRender

This menu allows you to start an operation on one or more objects and/or fixtures.
Operation | Move menu

The Move operations allow you to interactively manipulate the position horizontally and/or vertically by moving the mouse.
Operation | Move | XY
Shortcut : M ![]()
This option allows you to move an object or fixture both horizontally and vertically.
Operation | Move | X
![]()
This option allows you to move an object or fixture only horizontally.
Operation | Move | Y
![]()
This option allows you to move an object or fixture only vertically.
Operation | Rotate
The Rotate operations allow you to interactively manipulate the orientation of an object or fixture.
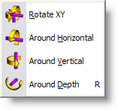
Operation | Rotate XY
Shortcut : R ![]()
This option allows you to rotate an object or fixture around both the horizontal and vertical axis.
Operation | Around Horizontal
![]()
This option allows you to rotate an object or fixture around the horizontal axis.
Operation | Around Vertical
![]()
This option allows you to rotate an object or fixture around the vertical axis.
Operation | Around Depth
![]()
This option allows you to rotate an object or fixture around the depth axis.
Operation | Scale
The Scale operations allow you to interactively manipulate the size of an object.
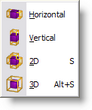
Operation | Scale | Horizontal
Shortcut : S ![]()
This option allows you to scale an object horizontally.
Operation | Scale | Vertical
![]()
This option allows you to scale an object or vertically.
Operation | Scale | 2D
![]()
This option allows you to scale an object horizontally and vertically.
Operation | Scale | 3D
![]()
This option allows you to scale an object uniformly by scaling the whole object by the same amount.
Operation | Lux meter
Shortcut: I ![]()
This option activates and deactivates the Lux meter.
See Lux Meter for more details...
Operation | Fixture Operation |
The Fixture operations allow you to manipulate one or more fixtures.
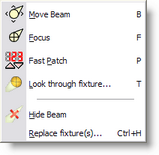
Operation | Fixture Operation | Move Beam
![]()
This option allows you to move the focus point of one or more fixtures, relative to its or their position(s).
Operation | Fixture Operation | Focus Beam
Shortcut: F ![]()
This option allows you to focus one or more fixtures on the point you click, and then drag the focus.
Operation | Fixture Operation | Look through fixture...
![]()
This function allow you to see as if you were inside the fixture looking out by the lens.
See Look Through Fixture topic for more details
Operation | Fixture Operation | Fast patch
Shortcut: P ![]()
This option allows you to patch fixtures using the mouse
See Fast-Patch for more details
Operation | Fixture Operation | Beam Hidden
![]()
This option allows you to hide/show the beam of the picked fixture.
See Preferences Options for more details on this
Operation | Fixture Operation | Replace Fixture...
Shortcut: CTRL+H
This option allows you to replace a fixture by another fixture. The fixture will have the same position, patch address and focus point. Other settings will be read back from DMX.
See Replace Fixture for more details
Operation | Alignment menu
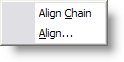
Operation | Alignment | Align Chain
This option allows you to align two or more selected objects in a chain like way.
See Align for more details
Operation | Alignment | Align...
This option allows you to align one or more selected object(s) to the active (picked) object. When you select this option, a dialog will appear.
See Align for more details
Operation | Combine menu
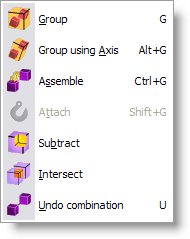
Operation | Combine | Group
Shortcut: G ![]()
This option allows you to group the selected objects together. The resulting group can be treated as a single object from then on. Such a group can always be split again by picking it and selecting the 'UnGroup' operation.
Operation | Combine | Group using Axis
Shortcut: ALT+G ![]()
This option allows you to group the selected objects together. The resulting group can be treated as a single object from then on. Such a group can always be split again by picking it and selecting the 'UnGroup' operation.
Operation | Combine | Assemble
Shortcut: Ctrl+G ![]()
Assembly grouping is similar to normal grouping except that fixtures in the group are still accessible individually.
A good example of an assembly would be a bar of 4 PARs
Operation | Combine | Attach
Shortcut: Shift+G ![]()
Use Attach to link Dynamic Objects with other objects.
See Dynamic Object for more details...
Operation | Combine | Subtract
![]()
See Subtractive Grouping
Operation | Combine | Intersect
![]()
See Intersect Grouping
Operation | Combine | UnGroup
Shortcut: U ![]()
This option allows you to split a group into its components. Each component will be added to the selection.
Operation | Turn Off Operation
Shortcut: Spacebar ![]()
This option turns off all current operation.
This menu allows you to manipulate the camera of a window.
See Camera for more details
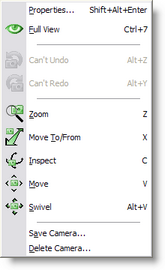
Camera | Properties
For information on the camera properties
Camera | Full View
Shortcut: Double click middle mouse button ![]()
This option will try to adjust the camera so that the entire scene will be visible in the current view.
Camera | Full View All
![]()
This option will try to adjust the camera so that the entire scene will be visible in all views.
Camera | Zoom
Shortcut: Z ![]()
This option allows you to interactively zoom in/out. In 2D windows, the scale will change and in 3D windows, it will be the camera angle that changes.
Camera | Move To/From
Shortcut: X ![]()
This option allows you to move the camera to and from. In 2D windows, this does the same as the 'Zoom' operation. In 3D windows, the camera is moved forwards or backwards.
Camera | Inspect
Shortcut: C ![]()
This option allows you to inspect an object by moving the camera around a point. In 2D windows this can only be done if you have an active (picked) object. The camera will move around the center of the object. In 3D windows the camera will move around the center of an active object if there is an active object, otherwise the camera will move around the focus point of the camera.
Camera | Move
Shortcut: V ![]()
This option allows you to pan up, down, left and right the camera.
Camera | Swivel
Shortcut: Alt+V ![]()
This option allows you to look around with the camera. In 2D windows, you can move around then view plane, and in 3D windows you can look around by tilting the camera from left to right and from top to bottom.
Camera | Save Camera...
This option allows you to save a 3D camera position, giving it a name. The camera will be stored with the scene file.
Camera | Delete Camera...
This option allows you to delete one or more cameras (from this scene file).
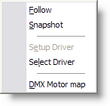
You will use the entries in this menu to select and setup a DMX driver and to change DMX input/output options.
See DMX for more details
DMX | Follow
The follow option will turn on/off the follow mode. If the follow mode is active, The program will be sampling the incoming DMX and update the stage settings accordingly, until you turn the follow mode off.
DMX | Snapshot
The Snapshot option will sample the incoming DMX once and update the stage settings accordingly.
DMX | Setup Driver...
This option allows you to change the settings of the current driver. What kind of settings (if any) are available depends on the active DMX driver.
DMX | Select Driver...
This option allows you to select which of the installed DMX drivers you want to use. If you select another driver, it will be used the next time you run the program. In other words, you have to exit and restart the program to have the change of DMX driver take effect.
DMX | Motor Map...
This option allows you to patch Dynamic Objects to DMX channel.
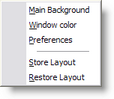
This menu allows you to adjust the appearance and preferences.
Settings | Main Background
This option allows you to change the appearance of the background of the main application window.
See settings for more details
Settings | Window color
This option allows you to change the background color of the 2D-and 3D windows.
See settings for more details
Settings | Preferences
In the preferences dialog you can set your preferences. Some are local (apply only to the ShowDesigner module), some are global (they may apply to all MyShowDesigner modules). The preferences are arranged into groups, with each it's own page (page). Each page ('Render Settings', 'Snap', 'Grid', 'Units', 'Detail', 'Gamma', 'Auto Save', 'Paths' and 'DirectX driver') will be explained next.
Render Settings page
See Settings for more details
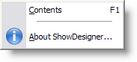
Help | Contents
Shortcut : F1
This option will display this help text.
Help | About ShowDesigner...
![]()
This option will display a window in which you can get information about the program. By clicking on the info button you will see information about the current installed version, the installation date, the serial number of the program and the name with which the program was installed. By clicking again on the (now 'Version') button, you