The cue list system allows you to store lighting 'states' with in the MSD and then play them back with simple timings. It is essentially a very basic lighting console built into MSD.
To bring up the cue list window, click on the View menu and click on Cue Lists.
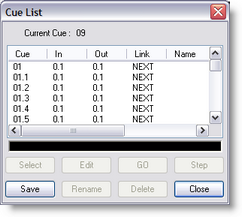
This list shows all the cues in this scene. As you can see there are several cues in this scene. In new scenes this list will be empty, the above example is taken from an existing scene.
Then to save your current look, click on the Save button, this will open the Cue Save window. Then fill in the cue number box, with what ever number you want. If you start with a 1, the next time you open the save window it will automatically count on one for you. Then type in a name for your cue and click OK.
Once you have created a cue, there are a few things you can do with it. For information on managing cues, see 'Cues '.
Cues can record incoming DMX values, so you can save the feed from a DMX controller and then play them back in your scene at another time.
When cues are running, the DMX values are outputted to other programs, for example the Visualizer and can therefore be used to control the lights in these programs.
At the top of the dialog, you can find the 'Current Cue'. This is the last selected cue. In the list itself, 1 or more cues can be highlighted. If an operation works on 1 cue only, it will be the first highlighted cue; otherwise it will work on all highlighted cues.
At the top of the list you see a gray area with the text 'Cue', 'In', 'Out', etc. This is called the header. In the header you can also see vertical lines. If you move your mouse cursor over these lines, you will see the cursor of the mouse change into a vertical line with two little arrows. When this happens you can click the left button of the mouse and while holding it down, move the mouse left and right. As you are moving the mouse you will see that the column width of the list will change. A double click on the vertical line will change the width of the column to the minimal width required to display all text in that column. Every cue has 8 columns:
| • | Cue |
This is the identifier of a cue. It can range from 1 to 999.999.999, which represents cue 999, subcue 999 and subsubcue 999.
| • | In |
This is the cue fade in time (in time notation).
| • | Out |
This is the cue fade out time (in time notation).
| • | Link |
Here you can specify a cue link to another cue.
| • | Name |
A descriptive name for the cue.
| • | Follow |
This specifies the follow-on time if a link is specified.
| • | Delay In |
This is the cue delay in time (in time notation).
| • | Delay Out |
This is the cue delay out time (in time notation).
At the bottom of the window are eight buttons. The functions of these buttons are described here:
| • | The Select button: |
Allows you to select the highlighted cue and it will become the current cue. In other words, the stage will represent this cue.
| • | The Save button: |
The stage settings will be saved as the highlighted cue.
| • | The Edit button: |
Allows you to edit the cue properties (fade times, delay times, link etc) of the (first) highlighted cue.
| • | The Rename button: |
Allows you to edit the cue number of the highlighted cue.
| • | The GO button: |
Will start a crossfade from the current cue to the highlighted cue. The Step button will turn into a STOP button.
After the crossfade is done, and an autolink is specified, the next crossfade to the linked cue is automatically started, and so on. It will stop when no autolink cue is specified or the user presses the STOP button. (See also Step)
| • | The Delete button: |
The Delete button will delete the highlighted cue(s).
| • | The Step button: |
The step button will start a crossfade from the current cue to the highlighted cue. While crossfading, the Step button will turn into a STOP button. After the crossfade is done, it stops. If an autolink is defined, it will not be executed. A crossfade can be stopped at any moment by pressing the STOP button. (See also GO)
| • | The Close button: |
The close button will close this window. You can leave this window open while you work with the program, or close it to have more room on the screen for other windows. Selecting the 'Cue list...' menu item from the 'View Menu' can open this window again.
A cue number represents a cue. You can define up to 999 cues. Each cue can be subdivided into 999 subcues (point cues) and each subcue can again be subdivided into 999 parts. This 3 level numbering is only used for sorting of the cues, so there is no difference between a cue with cue number 7 and a cue with number 4.27.200, it only means that cue 7 comes after cue 4.27.200
So, the 998001999 possible cues are sorted like this:
001
001.001
001.001.001
..
001.001.999
001.999
001.999.001
..
001.999.999
..
999
Cue edit dialog
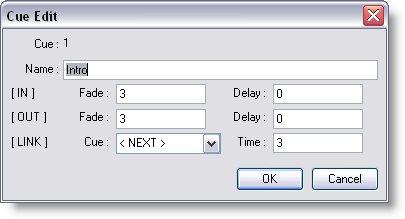
You can give the cue a name, time settings and (optionally) a link.
The name of a cue is purely informational for the user.
After [IN] you can enter the 'fade in' and the 'delay in' time.
After [OUT] you can enter the 'fade out' and the 'delay out' time.
After [LINK] you can specify if you want a link to another cue, and if so, what the 'link time' should be.
Time values are entered (and displayed) in 'time notation'. This format looks like this:
[[hours:]min:]sec[.tenthsec]
The elements between [ and ] are optional. The minimum time you can enter is one tenth second (0.1) and the maximum time is 999 hours, 59 minutes, 59 seconds and 9/10 of a second (999:59:59.9). So 20 is 20 seconds, 1:10 is 1 minute and 10 seconds, etc.
You can enter a time in different ways: entering 5025 (5025 seconds) or 83:45 (83 minutes and 45 seconds) will both produce 1:23:45 (1 hour, 23 minutes and 45 seconds) as time.
Default, a cue is linked to the next cue, so after 'link cue' you will see '< NEXT >'. You can select a link from the drop down box by clicking on the down arrow next to it. In the drop down box you will find the options '< NO LINK >', '< NEXT >' and all other cues. By selecting a link, a crossfade to this linked cue will automatically start 'link time' seconds after you started the crossfade to the cue you are editing. Selecting '< NO LINK >' will remove any link, and selecting '< NEXT >' will link to the next cue in the cue list, if there is a next cue, otherwise the crossfading stops.
| • | A crossfade example: |
A crossfade from cue A to cue B, where cue A has a 'fade out' of 5 sec. and an 'delay out' of 2 sec. Cue B has an 'fade in' of 4 sec, an 'delay in' of 6 sec, a 'cue link' to cue C and a 'link time' of 15 sec.
Crossfade timing example
Time (sec) |
Crossfade |
T |
User starts the crossfade by pressing the 'GO' button. |
T + 2 |
Cue A starts to fade out. |
T + 6 |
Cue B starts to fade in |
T + 7 |
Fade out completed. |
T + 10 |
Fade in completed. |
T + 15 |
The next crossfade (to cue C) starts. |