Properties
You can change most of the parameters of primitives and light-sources by using the property sheets. You can get the property sheet of picked primitives by right clicking in one of the windows containing the object. Doing this will show you the context menu, in which you can select options specific for that window. One of these options is 'Properties'. Selecting this menu option will display a dialog with multiple pages. This dialog is called a property sheet. Below the page windows you see three buttons, called 'OK', 'Cancel' and 'Apply'. You use the 'OK' button to accept the changes and close the property sheet. The 'Cancel' button just closes the property sheet without accepting the changes. The 'Apply' button can be used to accept the changes without closing the property sheet, this allows you to check the new settings and edit them if necessary without repeatedly opening the property sheet.
Following is description of the properties of primitives and the light-sources, beginning with the pages common to all primitives, and ending with the pages for the light-sources.
Primitive properties
The following two pages can be found in the property sheet of all primitives.
Orientation page
The first common page is the 'Orientation' page.
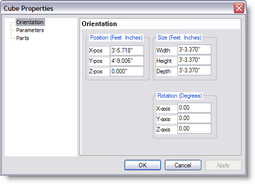
Primitive: Orientation of primitive

This page lets you enter the exact position, size and orientation of the picked primitive. The page is divided into three parts. At the top left you see three edit fields for the position. Next to the position you can see the fields for the size and below that you see the fields for the orientation. In this page you can enter the position and size in meters and the orientation in degrees, this can be changed in the user settings property sheet (see 'Settings Menu ').
Parts page
The second common page is the 'Parts' page.
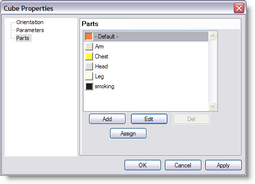
Primitive: Parts

The parts page allows you to manage parts in this object. All primitive used in the open object belong to a part. All primitives belonging to the same part have the same color or material.
Every new object will automatically belong to the '- Default -' part. This '- Default -' part is special, because it can be overwritten in groups or inserts in other objects. When you select a part for a group or inserted object, all primitives contained in that group (or insert) that belong to the '- Default -' part will become part of the selected part for the group (or insert).
With the buttons under the list you can 'Add' new parts, 'Edit' parts and 'Del' to delete them. After clicking on the 'Assign' button, the picked primitive will become part of the selected part. When you add a new part or edit an existing one, you will be presented with the following dialog.
Edit part description
|
In this dialog you can change the name of the part and change the color or material attached to that part. By default a part has a color, which can be changed by clicking on the 'Select' button. The color selection dialog will then be displayed, letting you select another color.
By selecting the 'Material' button you can attach a material to the part, again you can use the 'Select' button to select the correct material. A list of available materials will be displayed, in which you can select one. This list is managed using the 'Material List '. An exception to this is the '- Default -' part; this part can not have a material.
Parameters page
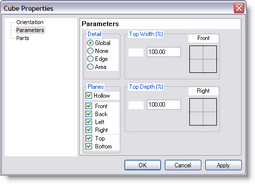
Cube parameter

This page is used to change the appearance of the picked primitive.
In the top left corner you can see an area labeled 'Detail'. This is used to change the subdivision of large areas. The quality of solid-mode lighting will improve with a higher subdivision. There are four options for this detail level.
| • | 'Global' : The subdivision is controlled by the global system settings . |
| • | 'None' : No special subdivision is performed |
| • | 'Edge' : All curves will be more subdivided |
| • | 'Area' : Curves, as well as large planes will be more subdivided |
On the right side there are two areas called 'Top width' and 'Top depth'. The fields in these areas can be used to change the dimension of the top plane relative to the bottom. Making both these parameter 0 for instance will result in a pyramid. The drawing next to the fields gives a impression of the result of the changes.
The last area in this page is the 'Planes' field. In this field you can make the primitive solid or hollow. When you select hollow, you can also remove some of the planes. (there should be at least one plane selected).
The above image shows the page for cubes (pyramids and triangles), but the other primitives offer similar pages.
