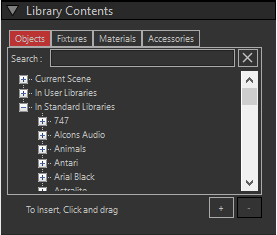
Objects and fixtures can be placed in the scene by dragging an item from the 'Library Content' window and dropping it in the scene area.
The first step is to select a view. We will start with the floor here, and then we are going to put some objects onto that floor, so a view from above would work best. Selecting 'Camera | 2D | Top' from the menu will make us look from above.
We are going to use a cube object as a floor, so open the 'Objects' list from the 'Library Content' section.
It will show you all model libraries, and when you expand a library (by clicking the '+' icon in front of the library), it will show all objects in the library.

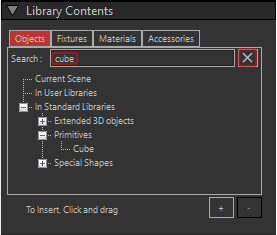
Because there are a lot of libraries, it can be hard to find what you need. One way to make that easier is to filter the contents of the libraries. For example, if you know (part of) the name of the object, you can enter that in the 'Search' box, and press Enter to search for all objects that contain the entered text.
We need a cube, so enter 'cube', press Enter and see what happens.

(You can clear the filter by pressing the 'X' button next to the Search box.)
Now drag the 'Cube' object from the 'Primitives' library towards the center of the scene area and let it drop. There should now be cube in your scene.
Note: If you drag an object from a library directly into the scene, and the object was not already in the scene library, it will be imported into the scene library automatically.
The cube has a size of 1 meter in all dimensions. To use this object as a floor, we need to resize it. You can do this several ways. We are going to use the sidebar properties here. Another way to do the same, would be to use the interactive scale operations.
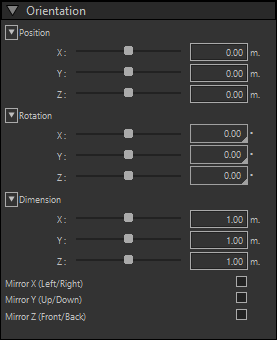
When you dropped the cube in the scene area, you might have noticed that the sidebar got some extra sections. These new property sections contain properties which are only valid when you have picked or selected an object or fixture. If there is no object or fixture active, these sections will become invisible. These sections start out collapsed, so you need to expand them before you can change the properties. Click on the '+' next to 'Orientation' to open the Orientation section. For objects this section can be used to change the position, rotation and size of the object.

Orientation properties (objects)
We want to make a floor of approximate 10m squared and 1m high. You can use the sliders for the X and Z to change the width and depth of the cube to the desired size. The further to move the slider from the center, the faster the values change, so be careful not drag the slider all the way unless you want to change the value very fast. Another option is to enter the correct values in the edit boxes. If you want to orient objects exactly, then you usually use the edit boxes to enter the exact values.
We want to have to top of the floor on a height (Y) of zero, so after we scaled the floor, we also need to move it. The position you enter here, is the position of the 'insertion point' of the object. For the cube and most other objects in MSD this point is located in the center of the object. This point is also the point on which the object rotates, and when you scaled the object, this point will not change location. In order to get the top of the cube at Y = 0, we need to move the insertion point of the object to half its height below 0, in this case -0.5m. To ease further work on the scene, we will make the X and Z values of the position 0. This will put the floor in the center of our scene.
Because of the scale and move some part of our floor might not be visible in the scene area. To fix this we use the 'Camera | Full View' menu option. This will change the position and angle ( scale in 2D ) of the camera to make sure the complete scene is visible.
Next we are going to put a woman on the stage. Locate the object 'woman 3' in the 'Persons_Female' standard library and drag the object into the scene area and drop it near the center of the floor, a bit towards the back. If you drop an object (or fixture) onto another object in the scene it will be placed against the first object located at the point where you dropped the object. So anything that you drop from above onto the floor will just touch the floor.
Next we are going to put up some truss towers. We are going to make two towers with 2 segments each, so we are going to need 4 truss segments.
As we earlier already imported the 'truss(20.5x20.5x10 feet)' object into the scene library, we can find it in the 'In Scene' section of the objects list, and drag it from there into the scene, otherwise you can find it in the 'Truss English' standard model library.
Drag & drop the truss object onto the floor 4 times, so we have our four segments.
You may notice that these segments are defined as laying down and we need to have them standing up. We could rotate each of them one by one, in a similar way as changing the size of the floor, or we can do them all together. To rotate them all together, we need to make them all active. We start by making sure no object is selected ( green boxed ) so we don't accidentally rotate another object in the scene. If there is something selected you can use the 'Edit | Deselect All' menu option to clear the selection. Now pick the first truss, then while holding down the Ctrl key pick the other three trusses one by one. Picking something while holding down the Ctrl key will put the current picked object into the selection, or remove it from the selection if it already is in the selection.
If you make a mistake and click on the floor or on the woman, then you should release the Ctrl key before you try to pick one of the truss pieces again, otherwise the floor or woman will also become part of the selection. If the floor or woman does get selected, you can unselect it by picking (red box) it, holding down the Ctrl key and clicking on an empty part of the scene area. That should remove the wrongfully selected object from the selection.
When you have all four truss pieces selected, you can rotate them at the same time by selecting ( or entering ) a 90 degree rotation around the Z axis.
We are going to build two towers that are located on the left and right side of the floor. Both will be the same distance from the front of the floor. That means that all parts will have the same Z-Position, and because we have them all selected now, we can set that value for all pieces at the same time. Lets make the Z position of all truss pieces 4 m, that will put them 1 meter from the front of the floor.
Now we will put all four pieces of the truss on the correct location. First lets change the camera to an isometric camera so we can better see what we are doing. Select 'Camera | Isometric | Iso SW' which will give us a view from the left front of the stage. We are going to place the truss pieces one by one so make sure that nothing is selected. ('Edit | Deselect All'). Now pick one of the truss pieces and change the Y and X position properties to the following values ( X = -4.0; Y = 3.05 / 2 = 1.525 ) This will move the truss piece to a position 1 m from the right edge of the floor, standing just on the floor. Now move the other pieces to the following locations
X Position |
Y Position |
-4.0 |
3.05 / 2 + 3.05 = 4.575 |
4.0 |
3.05 / 2 = 1.525 |
4.0 |
3.05 / 2 + 3.05 = 4.575 |
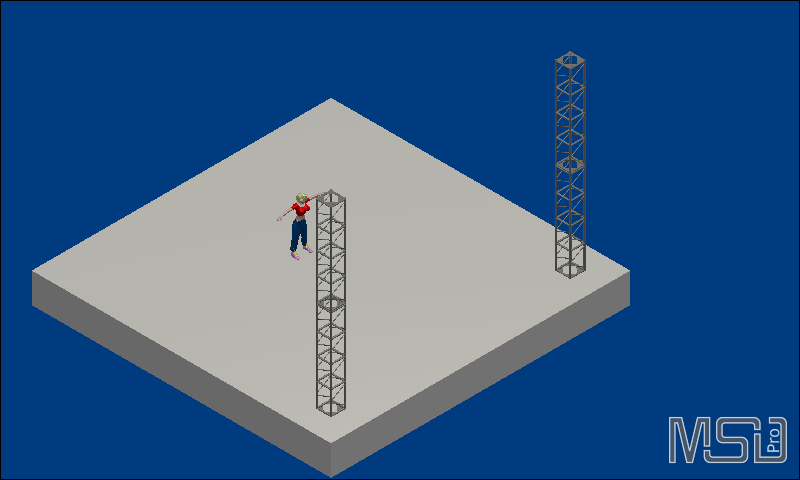
The scene should now look something like this

Scene after object insertion